You can not come into this game expecting it to be a breeze; it is NOT. This game was meant to be entertaining, not boring. Accolade did an excellent job with this game, and it's not something to sneeze at.
Essentially, there are 25 levels to this game (5 floors x 5 buildings). New GARgoyles are introduced on nearly every level, and there are many traps to avoid as well. These levels get progressively harder, though they remain "beatable" - that is, they don't get so hard that no human could possibly win. There is also, of course, an ultimate goal - to restart the main computer. Gar's troops will attempt to stop you from reaching your goal, and will do whatever it takes to bring your man down. So watch your back, and be prepared.
I have taken the liberty of naming these metal toilet-brushes, mostly to make things easier to describe on subsequent pages. These names were not included in the documentation, or the game.
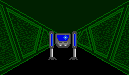
Building 1
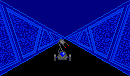
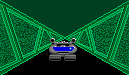
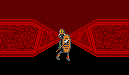
This guy is nothing; he probably doesn't even know how to tie his shoes. Minimal firepower, a cinch. His hot spot is his head area.

Just like one of them Shiatsu's...all bark, no force. This guy can't do nothing. His hot spot is his yapping mouth.
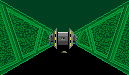
Hah! Another laugher...all this guy does is sit around tapping his foot. Minimal destructive power (if any). Hot spots? His leg intersection joint and his head.

This guy is more respectable; he is capable of doing some damage. His hot spot is located right in the middle of his tracks.
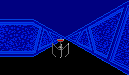
This guy is more a pest than anything. His hot spot is the V-shape in his body. I suggest a bola bomb to finish him off; it saves power to just kill him with the bola rather than fire off rounds trying to hit his moving hot spot.

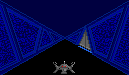
Whoa! Now HERE'S are Gargoyle! Major firepower...avoid as much as possible. If you come within range, you'll be blasted to bits if you don't kill him quick enough! Hotspot? There's a green ball underneath his firing array; that's it. Hit that with at least 4 good shots, and he's gone! Then get yourself repaired. A grenade thrown from just out of range will also do the trick. For clusters of these pulverizers, use a Neutron Detonator.

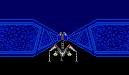
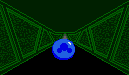
This sucker's more of a reconnaissance-type robot. Not much destruction ability. Hot spot? His glass dome.

This guy is also quite respectable. When on lower levels, your shield may not be powerful enough to repel his attacks while you blow him with your Laz Gun. Therefore, I suggest you use a grenade in these circumstances. On later levels, with better shield technologies, this guy is not much of a risk. His hot spots are his eyes and his firing battery (not pictured).
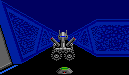
This guy can fire quickly, so he is also seen as a threat. It is suggested that you kill him with your Laz Gun, and worry about repairing any substantial damage later on.
This guy doesn't have the capacity to do any real damage; a few well-placed shots on his glass face will finish him easily.
Traps
Personally, I have found traps to be more of an annoyance than anything else. They are easily avoided, and you can "run" over them at a fast speed by clicking on the forward button rapidly to avoid having them go off. To make extra-sure on the nasty ones (such as the de-plotter and the proton mines) a grenade may be thrown from just out of range to distribute pieces of the former trap all over the hallway. Only do this on the important ones, however, because grenades are a precious commodity. Oh...stabilizer circuits are available for all traps as well; visit the items page and the manual for more info.
 Disrupter
Mine
Disrupter
Mine
This bad boy drains power when you set it off.
 Proximity
Mine
Proximity
Mine
This one damages the structure of your Viper android.
 Gyroscopic
Trap
Gyroscopic
Trap
This guy spins you dizzily and sends you flying off in a random direction, inflicting structural damage as it goes.
 Teleport
Trap
Teleport
Trap
This guy has a habit of teleporting you to a random area of the current map (floor) attempting to slow your progress. No power loss or damage inflicted.
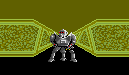
Building 2
This guy is not much of a threat either; a few well-placed rounds where his "roof rack" meets his body should finish him off.
This guy is a terrible annoyance - more of a mosquito than anything. His rapidly-moving hot spot is hard to hit, so unless you're a really good shot I suggest a bola bomb to put him out of his misery.
This guy definitely packs a wallop, but is easily killed. A couple of well-placed shots to the chrome-dome and he's dead. Just make sure he doesn't sneak up behind you, though!
Another pest, this guy is more of a shooting wall than anything. Deployed strategically to block your movements, these guys have a small cannon located deep inside them. No damage potential. Their hot spot is their cannon. These suckers also move, so hitting their cannon can be challenging. They are also easily killed with a grenade if you tire of the Laz Gun.
These guys are a mild threat. Their hot spot is their mouth area, located just below the glass windshield in between the 2 gray weapon covers.
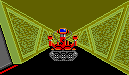
Building 3
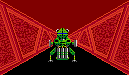
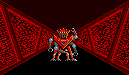
RED ALERT! These guys are definitely a part of Gar's Elite Corps. Heavy armor and deadly firepower combine to try and fuse you into a pile of metal goop. These guys are best taken out by throwing a grenade at them first, and then finishing them off with your Laz Gun. Their hot spot is their 3 beady eyes. Be sure to have lots of repair pods on hand!
Whoa! Another big daddy! These guys are extremely dangerous as well, owing to their rapid rate of fire. Laz Gun killable, by aiming for their head. A bola bomb will also do the trick, but only as a last resort.

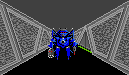
This guy is quite the fellow. First of all, he has the ability to cloak. Second of all, his weapons are pretty formidable. His hot spot is his head, but it is suggested you kill him quickly with a Neutron Detonator to avoid the massive pummeling he is sure to radiate.
These guys are a mild threat, easily killable with your Laz Gun. His hot spot is his eyes.

Yikes! Major firepower! Avoid if you wish to make it to the next level. A bola bomb is suggested here. These guys move fast, so be careful.
These guys are a non-threat. Their hot spot is located on the left-hand side of the "V" that runs the height of them. It's small, so it may take some time to perfect the aim. Easily killed by your Laz Gun.
This guy is a major pain. Not much damage potential, but he's so heavily armoured he is hard to kill. Comparable to a moving, shooting wall, these guys block your way. If you're quick about it, they can be killed by Laz Gun. This method is not suggested, because it takes too much power. Rather, use a neutron detonator to dispatch of this beast. His hot spot is an opening near the bottom of his armour. However, this area is only vulnerable when he's shooting.
Not much of a threat, these guys have minimal firepower and can be easily killed by your Laz Gun. His hot spot is the intersection point of the three balls.
 De-Plotter
Trap
De-Plotter
Trap
These are NOT the kind of traps that play nice. When set off, they emit a high-frequency energy burst that destroys your plotter module. In other words, it rips up your map! Without your plotter module, you can not see where you're going. It's difficult to navigate without using your plotter display, so avoid these traps as much as possible.
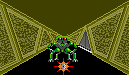
Building 4
These guys are also quite formidable. To kill, first toss a grenade at him, then finish him off with your Laz Gun. His hot spot is his mid-section.
Yikes! This guy is a major opponent. Kill as soon as possible! Has the potential to cause major damage. His hot spot is the middle wire going down to his belly array. However, it is suggested that you kill this guy with a grenade. If you feel lucky, use the Laz Gun; make sure you have lots of repair pods though!
This guy is mediocre. His hot spot is his glass dome. Your Laz Gun will easily dispatch of this dude.
The only thing this guy has going for him is good speed. Easily killed with a Laz Gun, if you can hit him. Alternatively, a grenade or bola bomb will also work.
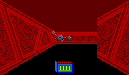
This fellow is a strange addition to the game. He does no damage, and dies with the first shot of a Laz Gun. Explained if you follow the base communications carefully!
This guy doesn't do much. A few well-placed Laz Gun shots will take him out. His hot spot is his eye area.
 Proton Mine
This is the deadliest of all the mines. This sucker has the ability to knock out a chip on your circuit board, as well as causing damage and power loss. These are definately worth the grenade that can be thrown to get rid of them!
Building 5
This is definitely another of Gar's Elite Corps. This guy has incredible firepower and good armour. A grenade is suggested to damage him, and then you can finish him off with a Laz Gun. His hot spot is the gap in his armor where his neck is.

This fellow also has the ability to cloak. He is mediocre, but can be an annoyance, since his hot spot is constantly on the move, and often invisible. Aim for his head area.
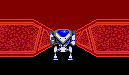
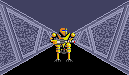
This guy can be quite formidable, and he has heavy armor backing him up. His hot spots are the hole in his chest, as well as his eyes.
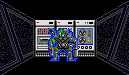
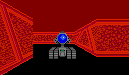
Guess who! Yup, it's Gar. And he has Prototype-1 of the new sheild and particle weapon technologies. The only time he's vulnerable is when he shoots, so it is suggested that you come loaded with 2 grenades and energy. Throw 2 grenades (NOT more, because he seems to regenerate if more than 2 are thrown) then start firing at him. Don't pause until he's dead, or you need to replenish your power. Otherwise, he is much too fast to kill.